Monday, February 21, 2011

Easter Blossoms Faux Cameo


Materials needed:
Acetate sheets
White StayzOn
Soft Suede classic ink
Crystal Effects
White, Pink Pirouette and Soft Suede paper
Border punch and corner punch
ribbon
Embossing folders (optional)
medium SU pearls (3)
small flower punch
larger 3-flower punch

Directions:
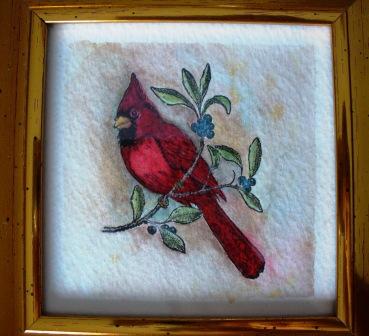
Stamp the image on a sheet of acetate with the StayzOn and cut out very close to image. Glue to an oval cutout of Soft Suede and then to a larger oval of embossed white. Sponge the edges of the white oval slightly with Soft Suede ink.
Stamp the branches in Soft Suede ink on a piece of Pink Pirouette and affix the ovals as shown. Layer this on a piece of white that has the border punched all around and then on a piece of Soft Suede. Add ribbon and put entire thing on the card front.
Go over the acetate sheet with Crystal Effects.
To make the 3 small flowers at the edge of the frame, I embossed the surface of a scrap of Pink Pirouette with Iridescent Ice embossing powder and punched them out. I punched 3 larger petaled flowers with the larger flower punch from a piece of white embossed paper and added the pearls to the center.

Monday, February 14, 2011

Stampin' Up!'s Unmounted Stamp Sets

So, you try the new unmounted sets, which are, no doubt, really nice. They are rubber stamps that have cling vinyl labels that stick to the back of the stamps so you can see right where to stamp. The only problem is, how do I line up and get those stickers where they belong... and then you get the labels off just a teeny bit, and, "YIKES!" it's not lined up right and you try to take it off the stamp, but the glue is so strong, it rips the foam back off the stamp or the vinyl label stretches and warps, never to lie flat again! Happen to you? Well, I've written a tutorial that will help, so go get a copy and have a "Hassle-Free" time putting your labels on the backs of those stamps!!

Here it is for you to download: Tutorial for Hassle-Free Labeling of SU's Unmounted Stamps

Also, some people have been frustrated by how to get them to stick to the block. I think it's Chemistry 101, but not sure... (I didn't do too well in that course!!) but it has to do with "bonds." Not the savings type, but how the vinyl bonds to the acrylic... it works best if you lay the stamp down on a flat surface with the vinyl label up, then "huff" on the acrylic block and press it down onto the vinyl backing with a slight sliding motion. Let me know how you make out!

Tuesday, February 1, 2011


February's Stamp Camp is going to feature watercoloring which is something I've been planning to do for awhile. The frames are $1 store frames, and this makes an inexpensive way to frame stamped images and they make great gift ideas! Whenever I find square frames at the $1 store I pick them up for this purpose. Here are a few I've done.

Thursday, October 28, 2010

Videos of Projects Available


Sometimes it's just easier to see things as they are done rather than to read directions, which is why some of my directions might have the picture of the project and then it reads, "watch the video," and you're thinking, "I don't have the video!!!" Well, since the videos are long, some being 15 minutes or more, I've compiled some of the videos that we've done in the past couple of years onto DVD's. I'm not a pro at making these, but I did test them and they work, so if you would like one, there are 2 of them and they have about 4-5 projects on each of them. You can order them here by EMAILING ME and I will ship them for $5 each which will cover the cost of materials, postage and shipping. You can get them both for $8. Above is a picture of some of the projects that are on them.

Thursday, July 29, 2010

Recipe Dividers


Here's a recipe divider page I did for a swap that I think turned out pretty well... at least it was a lot of work! It measures 6x6 but could be enlarged easily! Hope you like it and get some ideas! The SALAD divider is what we will be doing in September, so limber up those joints for all the punching and sponging!!

Saturday, May 22, 2010

Graduations & Weddings


June is coming VERY quickly and I decided to do some wedding and graduation cards, as I will be needing them this year! Also, the color palette for these formal looking cards is the "Naturals," since Stampin' Up! is dividing the color palettes this year. They are fun to work with and will give a formal look to any card. Used in these two are: Sahara Sand, Basic Gray, and white. Of course, dry embossing with the embossing folders helps to make them extra special!

The graduation card uses Night of Navy, Ballet Blue (being discontinued!), white, and Basic Black cardstock. The little graduation cap is made with the 1 1/4" square punch and trimmed to be diamond-shaped and the 1" and 3/4" circle punches with a black brad and some embroidery floss. The graduation stamp is from the new Summer mini and the swirl is from the Season of Joy stamp set.

Friday, May 21, 2010

What Am I Doing??


Well, here's a project for all you "green" people out there... my husband likes to purchase Raisin Bran cereal in those HUGE boxes at Sam's Club, and they really are nice boxes... corrugated cardboard rather than the single layer that most boxes are. I really am tired of crushing and sending them to the curb so I made these paper holders. (Watch out you "Cropper Hopper" people!!)
After cutting them down, I decoupaged them with white paper first (just so the cereal box wouldn't show through the scrapbook paper) and then I decoupaged Handsome Hunter cardstock on the bottom and scrapbooking paper on the top portion. Then added a ribbon around the seam and a card holder from the brass Hodgepodge Hardware set. Finally, I thought the inside needed something, so I cut felt-backed vinyl and tacked it down with tacky tape on the inside. Hope you like it!